Ultimate Guide To The WordPress Admin Dashboard
- Create and edit posts
- Upload and manage media
- Install a theme
- Install a plugin
- Edit widgets
- Manage comments
- Update WordPress
- Create and manage users
How to open the WordPress admin dashboard
You can log into the admin
by adding /wp-admin to the end of your domain. For example, if your domain is https://myblog.com the login URL will be:
https://myblog.com/wp-admin
You can use this URL too, but it is a little bit more type:
https://myblog.com/wp-login.php
Log in using your username or email address, and password.
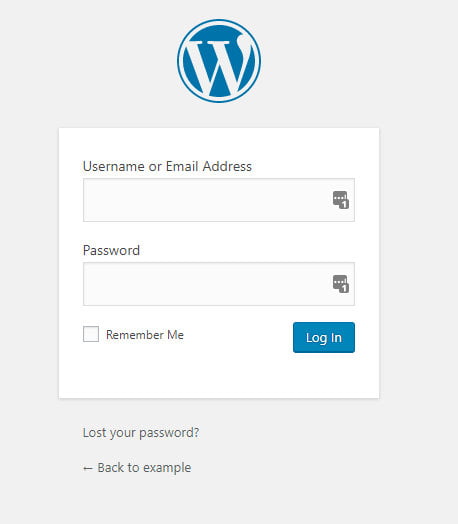
Can’t log in to the WordPress admin dashboard?
If you have forgotten your password click the Lost your password link and you will be able to reset it when you receive a password reset email.
If there is a problem and you still can’t log in, or you didn’t get the email, do raise a ticket with your host and they should be able to reset the password for you.
I thoroughly recommend using a password manager such as LastPass. LastPass is free, and for me has been a lifesaver because I always forget passwords!
The overall layout of the dashboard
The WordPress admin dashboard consists of three main areas, the top toolbar, a menu on the left and a central content area which will change depending on what you have selected from the menu.
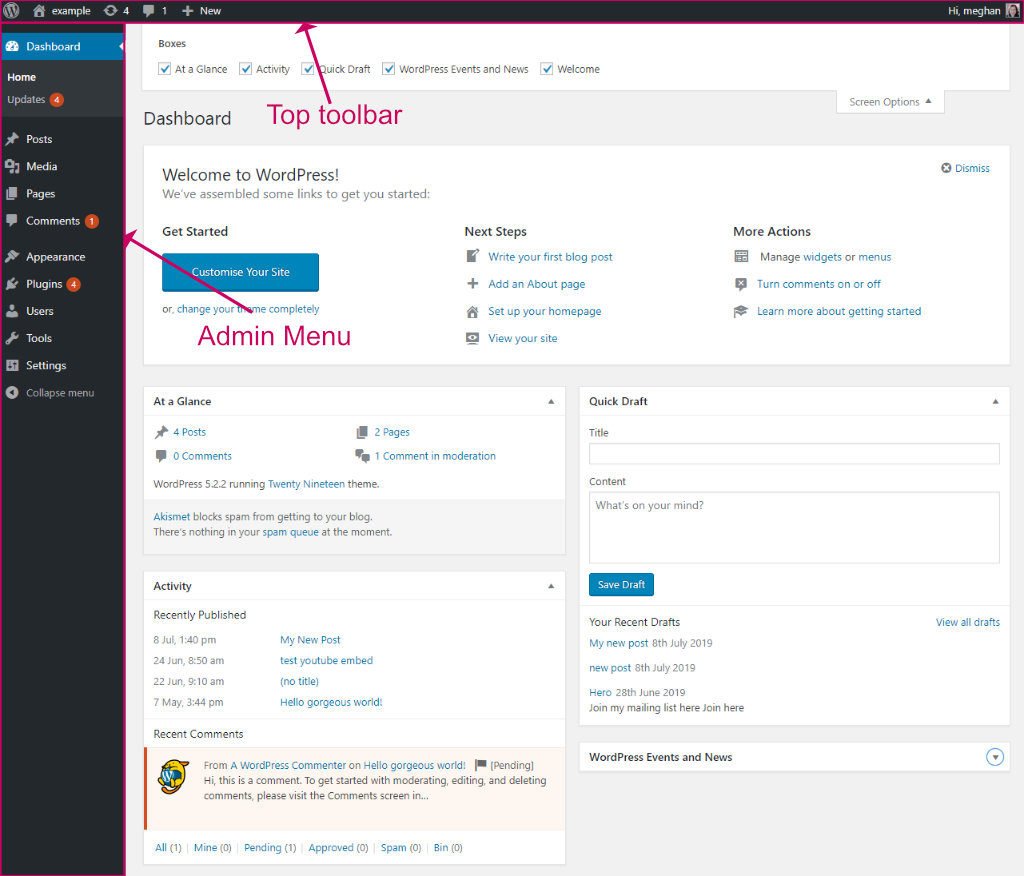
The top toolbar
The top toolbar is always shown when logged into WordPress unless you turn it off in your user profile settings.
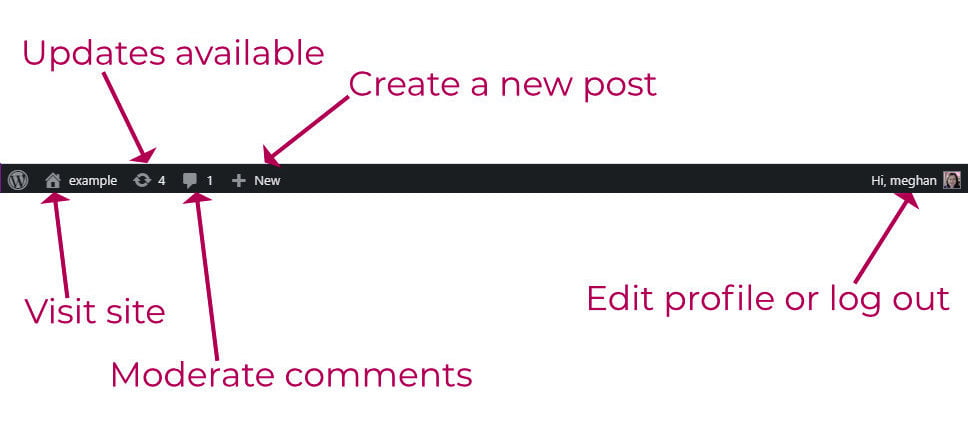
The top toolbar serves as a quick way to do the most common tasks:
- Use the Home icon to switch between viewing your site or the dashboard.
- If updates are found, the Updates icon will show up along with the number of updates available.
- If comments are due for moderation the Comments icon will show up along with the number due for moderation.
- Quickly create a new post or page with the Plus icon.
- Edit your user profile or log out by clicking on your name on the right.
Left-hand admin menu
The menu on the left allows you to navigate through the various administrative parts of your site.
You can collapse the menu so that only icons are shown by clicking Collapse menu at the bottom. I find this useful if screen space is at a premium or I want a more minimalist look.
Now let’s go through each option on the left-hand side. The number of options you see may vary slightly depending on what plugins you have installed. For example, the Yoast plugin adds SEO to the menu. We will go through all the options that are there by default when you install WordPress.
Dashboard
When you first log in to the WordPress admin screen, the Dashboard is usually shown first.
Again what you see here will vary depending on what plugins you have installed. Many plugins add extra widgets to this screen.
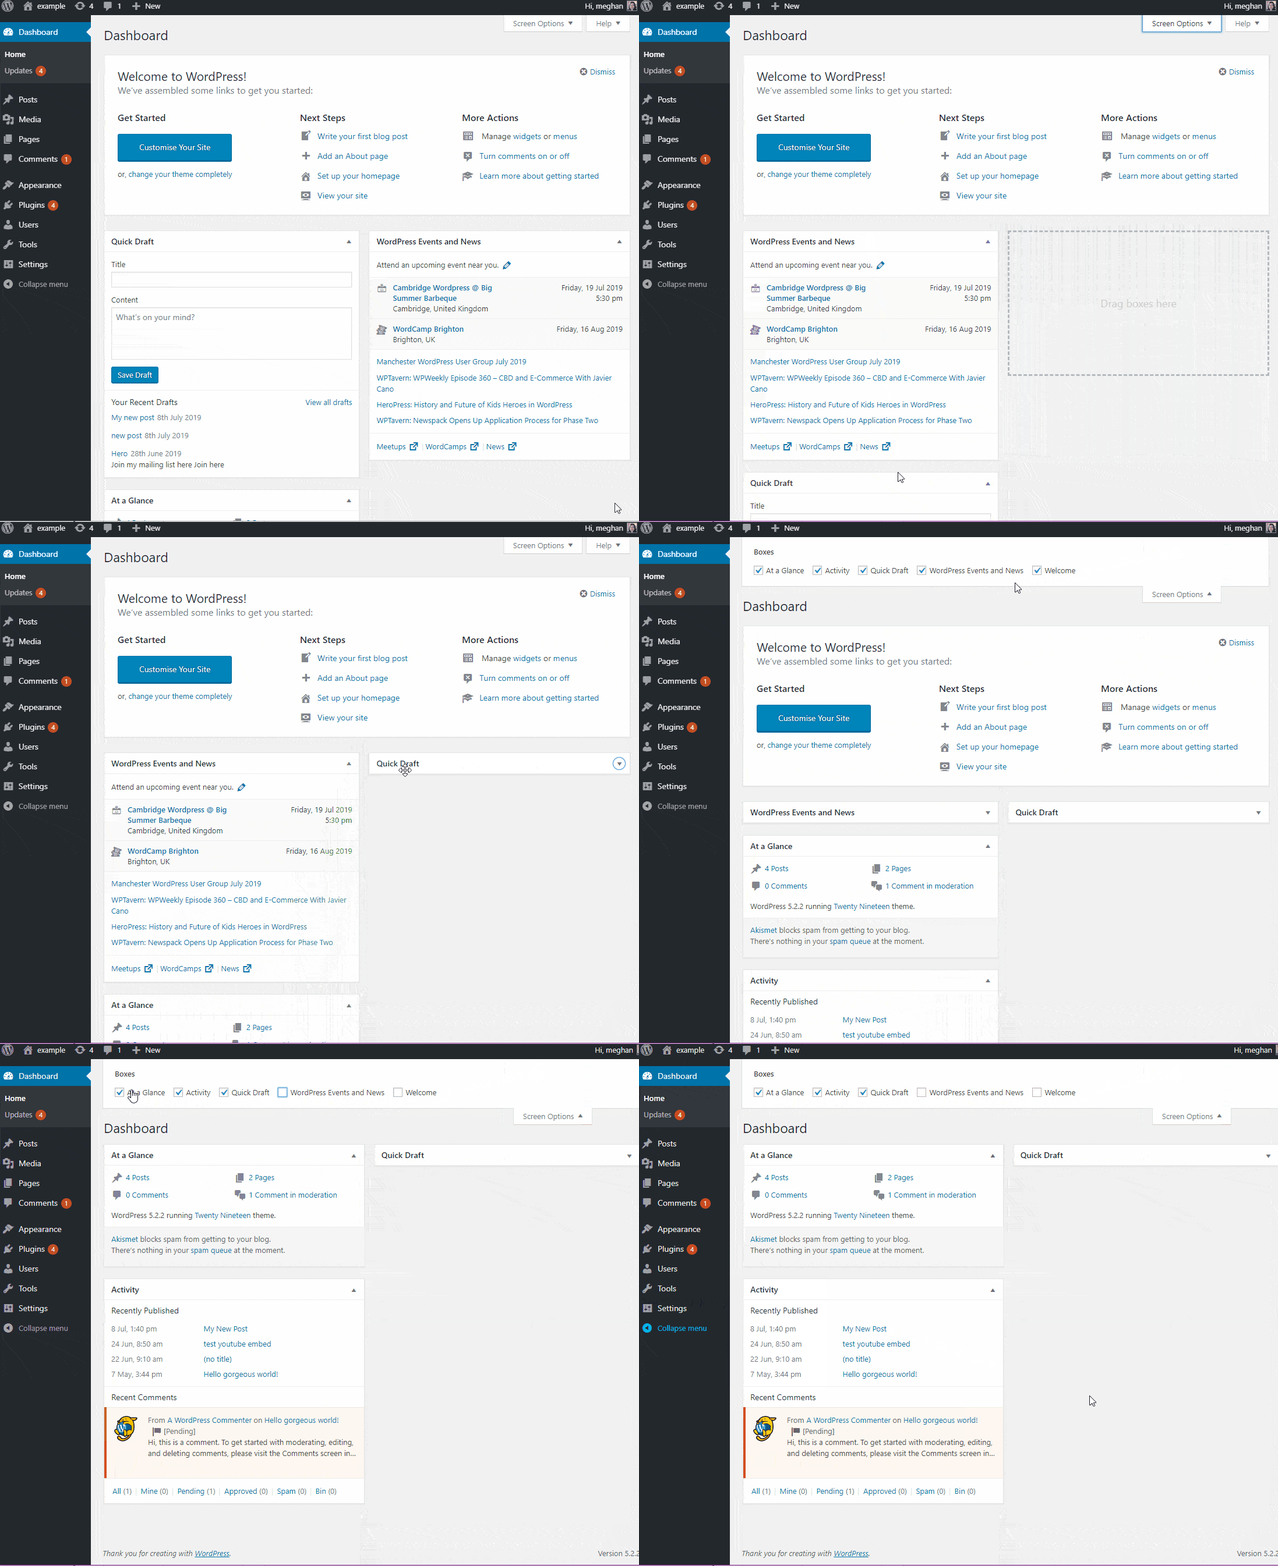
- Each box can be collapsed and moved around to suit, by drag and drop.
- You can show and hide boxes using the screen options at the top.
Posts
As a blogger, the posts screen is probably where you will spend most of your time. When you click on the posts tab you will immediately see a list of all the posts you have on your blog.
- You can view the posts you have Published or are in Draft using the links at the top of the list.
- If you have a lot of posts you can also Filter by date or category.
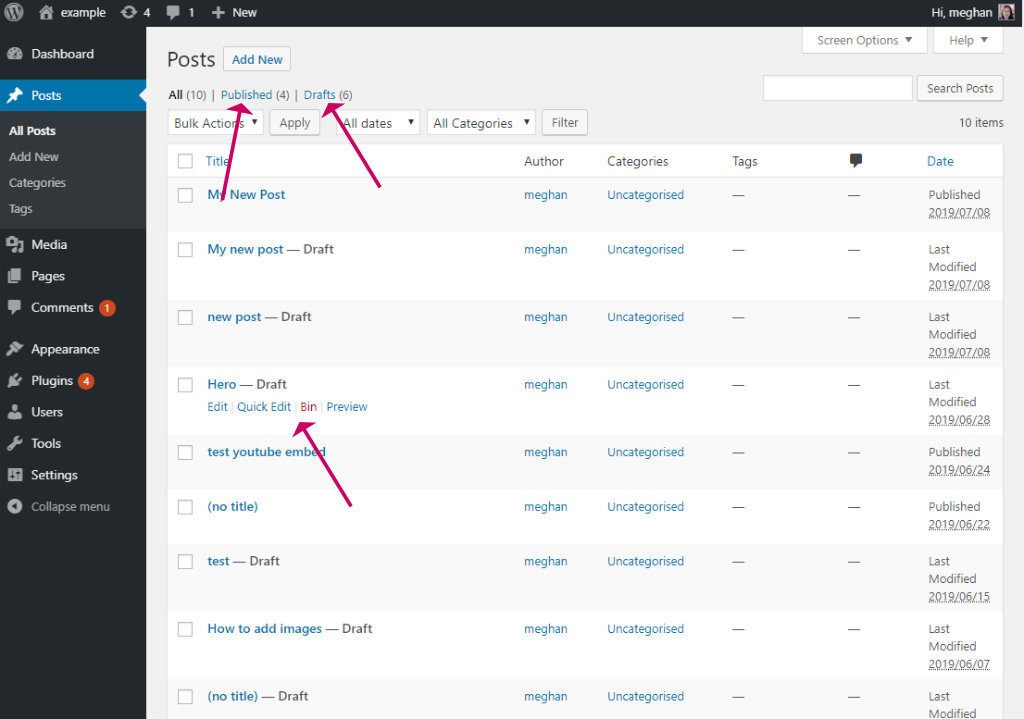
- When you hover over a post’s title, a sub-menu appears which you can use to edit, bin or preview the post.
- You can also edit a post by clicking on its title.
- To add a new post click the Add New button, or click the Add New link from the left-hand menu.
Posts can be placed into Categories and Tags. Use the Categories and Tags tab to set those up.
- A category allows you to group posts. For example, you might have a category called DIY. A post is usually only in one category but can be in more than one. Categories are hierarchical, i.e. your DIY category could have sub-categories called painting and wall-papering.
- You can describe a post further by giving it one or multiple tags, for example, you might tag a post easy-project and/or 5-minute-job to indicate the difficulty and time to do the job.
Media
The media screen is where you can manage all types of media uploaded to your site, including images, pdf’s, and gifs.
- Use the icons on the left to view your media in List or Grid mode.
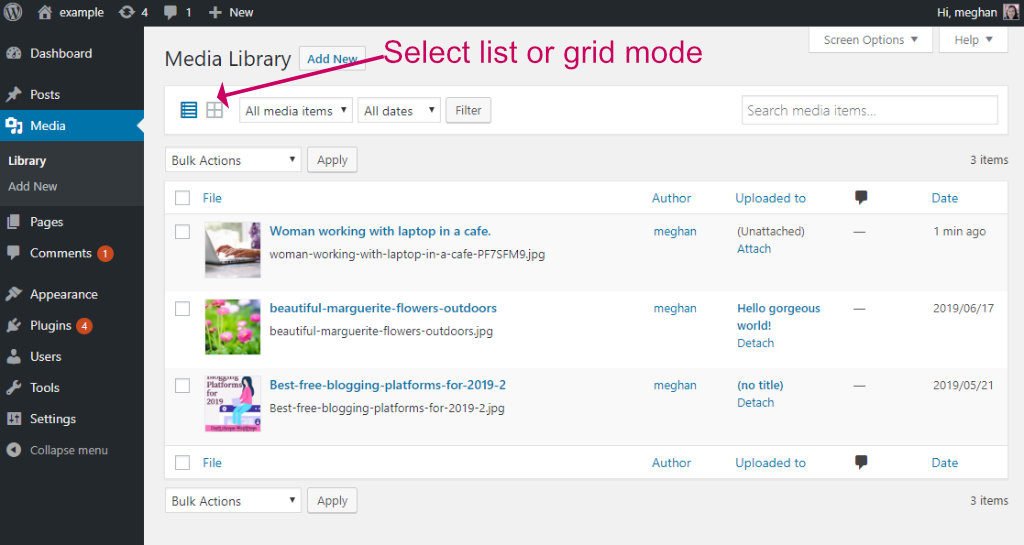
- You can quickly upload a new image by dragging it from the File Explorer, or Finder App into the image list area.
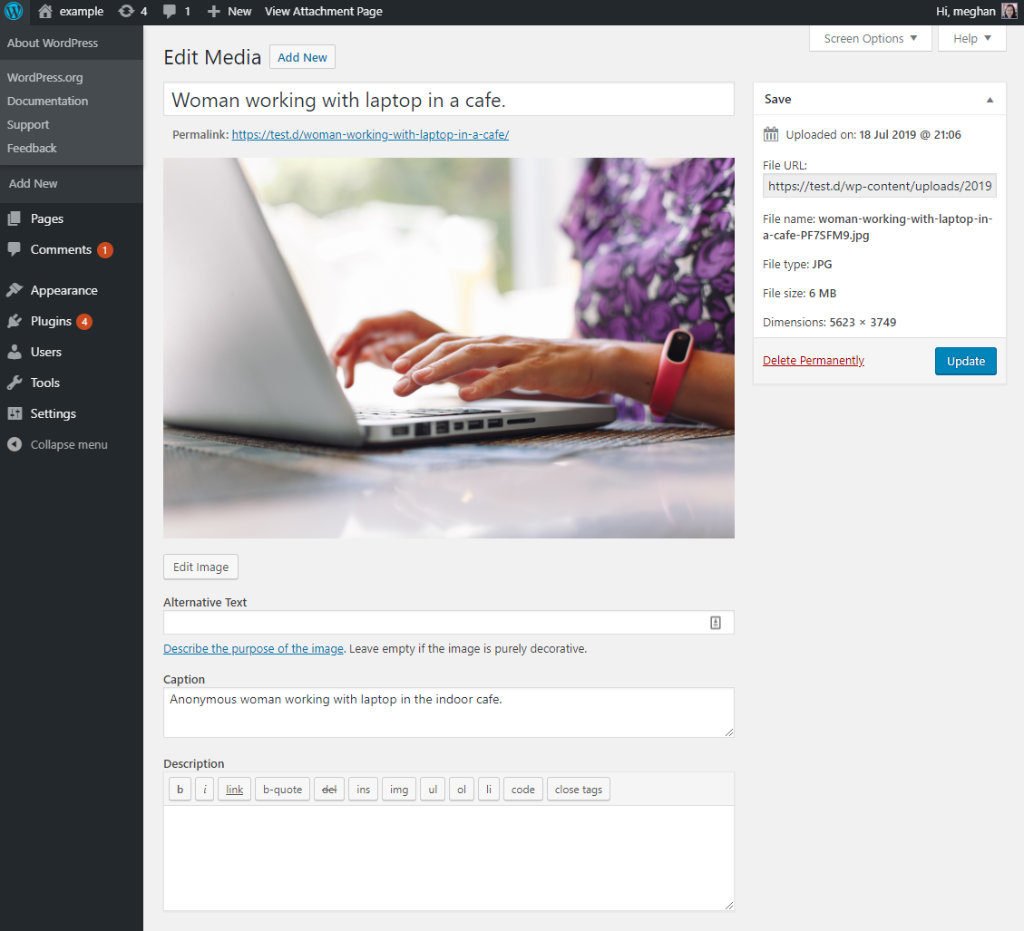
- To edit an image click on its title, or mouse over it and click Edit where you can change the title, alternative text, caption and description. For good SEO you should enter a title and alternative text.
Pages
Pages are where you would write your about page, contact page, or home page. Page don’t have categories or tags, but unlike posts, they can be hierarchical.
The method of managing and writing pages is exactly the same as for posts in the previous section above.
Comments
The comments tab allow you to view and approve any comments you receive on your blog. If you are not sure whether to enable comments or not, I would say that you should. It is a great way to engage with your audience.
Comments are turned on by default, you don’t need to do anything to enable them, but if you want to disable comments, go to Settings->Discussion, where you can set some discussion options too, such as whether to moderate.
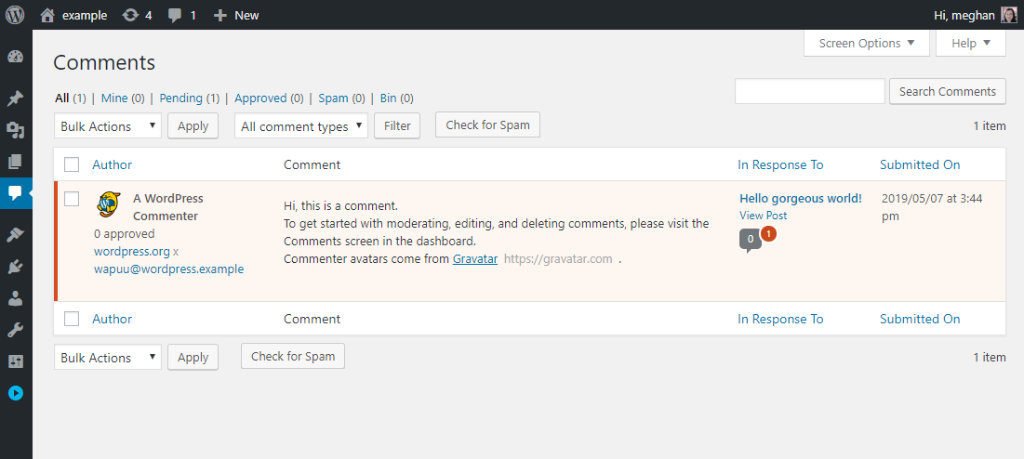
- Using the links at the top you can view what comments are pending moderation.
- As you mouse over the comment, quick links appear allowing you to approve, reply, and edit the comment.
In the beginning, you are unlikely to receive many comments, possibly it will be only spam at first.
If you start to get spam, consider installing an Antispam plugin. If your blog is hosted on wordpress.com you don’t need to worry, because spam checking is included.
Plugins
Plugins help you to extend the functionality of WordPress. It is very likely that you will add at least a few.
If you are on self-hosted WordPress or the Business plan on wordpress.com you can manage the plugins you use on your site.
To use a plugin, you must first install it, and then activate it. You can deactivate a plugin, if you don’t want to use it any longer, or delete it completely.
Here is my post on essential plugins that I always install on my blog – Essential WordPress Blog Plugins.
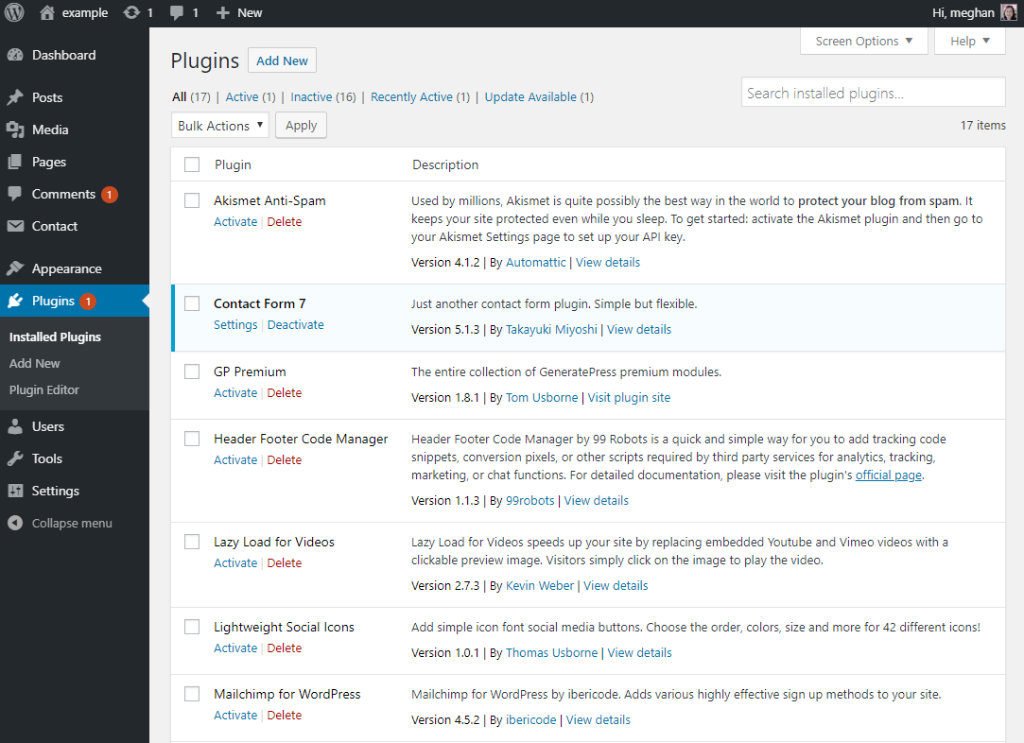
- When you click on Plugins in the left-hand menu, a list of installed plugins will appear.
- To add a new plugin click the blue Add New button or click the Add New link from the left-hand menu.
Appearance
The appearance tab is where you can make changes that affect the look of your blog, including adding new themes, adding widgets, editing menus, and customising the look of your blog using the customiser.
- Use the themes tab to manage the themes you have installed.
- By hovering your mouse over a theme you can activate it or see a live preview of how your blog will look with the new theme installed.
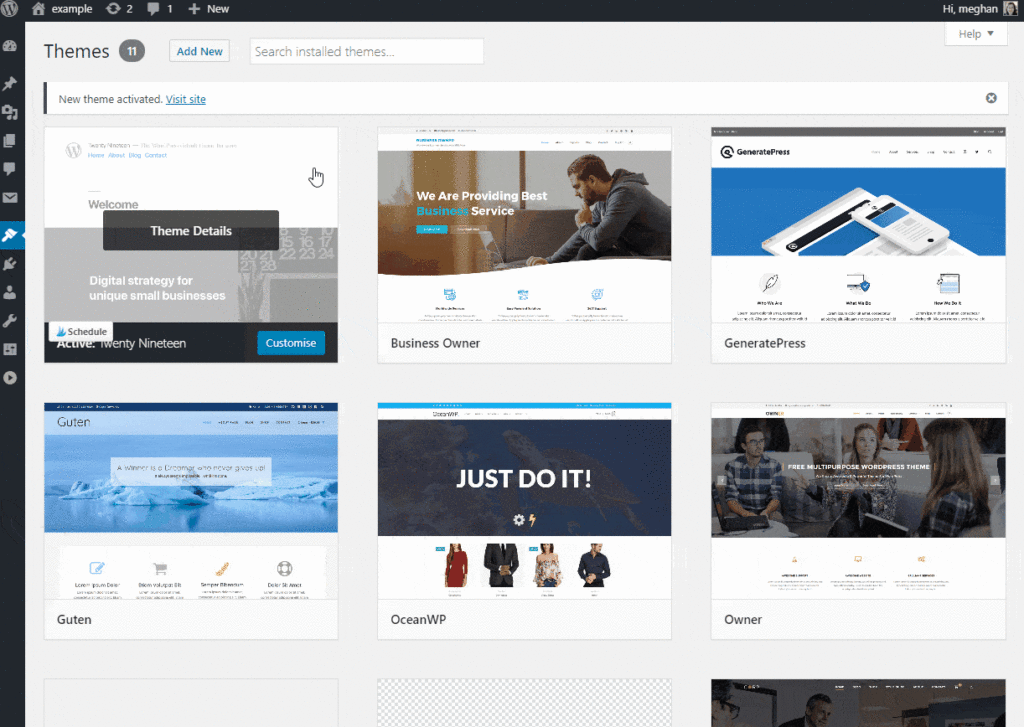
- You can delete a theme by clicking on it and clicking Delete. It is recommended that you do not keep too many themes installs besides your active one. Once you have decided on your theme, delete the rest apart from one, the default WordPress theme (TwentyNinteen) is a good one to leave installed.
The customise option is where you can define how your theme looks, and see the potential effect immediately. More and more themes now make good use of the customiser, rather than having a separate option for modifying options under the Appearance or Settings tabs.
You can access the customiser both under the Appearance tab and in the top toolbar when viewing your blog.
The options that you will see in the customiser will vary depending on which theme you are using.
Here are the options available for the GeneratePress theme.
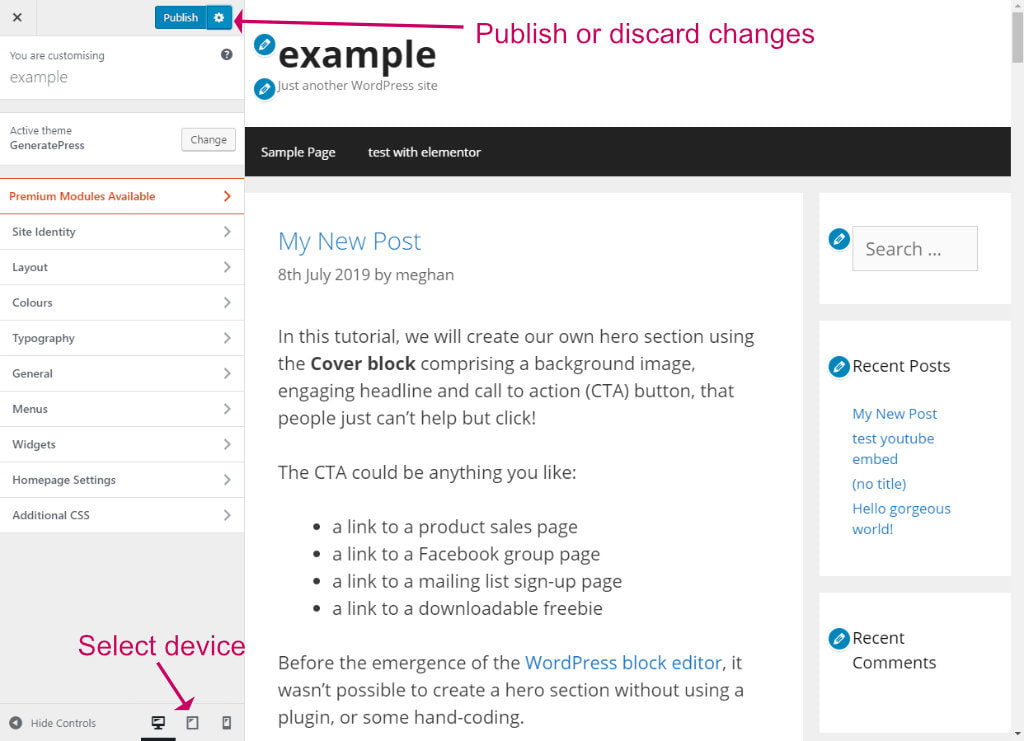
Click on the sections to drill down to specific options. Here are some tips for using the customiser:
- Use the pencil icon next to various sections of the site to quickly jump to the correct place in the customiser for editing those sections
- Click Hide Controls (bottom left) to get a clearer and wider view of your blog.
- Use the Device icons at the bottom to see how the changes look on a phone or tablet.
- To see the effects of your changes on the whole site you can navigate through your blog, clicking on pages, posts and archives etc. to get a full picture, the customiser will remain active.
- Click Publish to save changes.
- You can save a Draft of your changes by clicking the cog icon next to the blue publish button. You can also schedule changes to go live at a certain time.
- To discard changes, again click the cog icon, then click the red discard changes link.
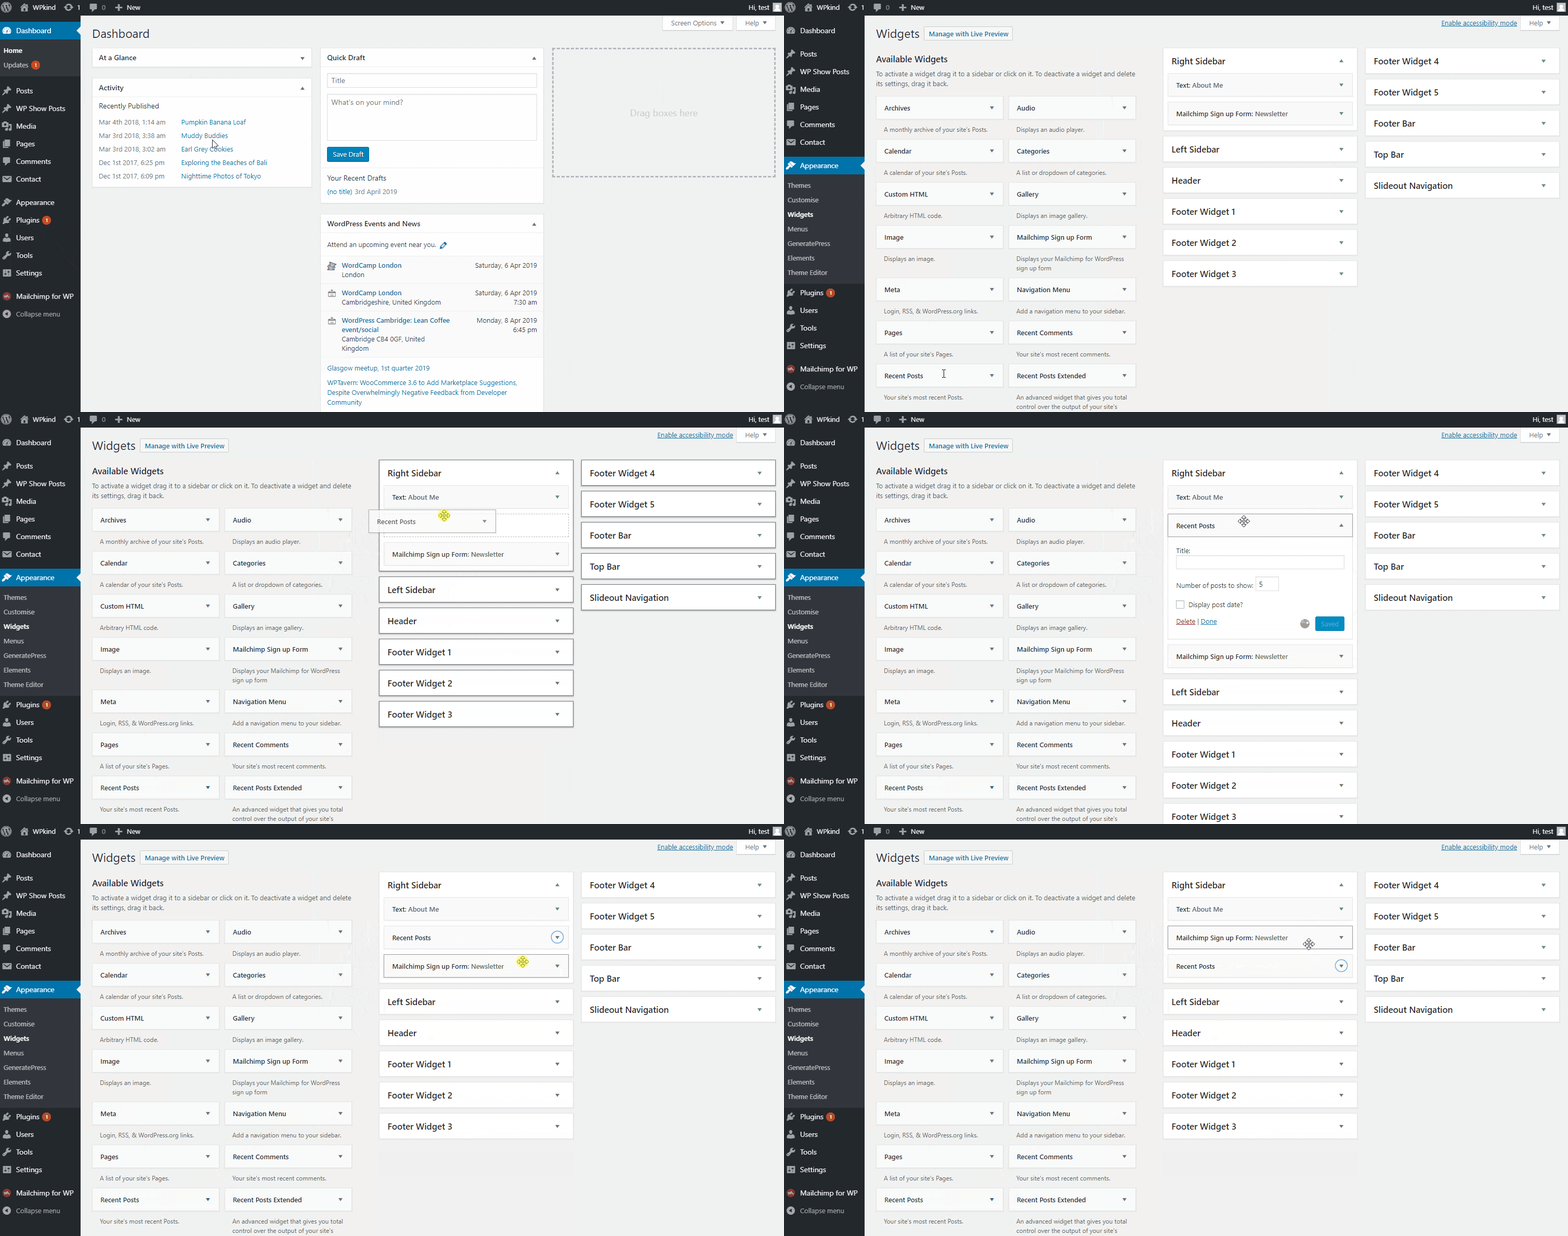
The Widgets tab is where you can add widgets to any widget-enabled area of your blog.
A widget is a small self-contained block that adds a specific function to your site. For example, by adding the Categories widget to a sidebar you can show a list of categories, everywhere that the sidebar is displayed on your blog.
A widget-enabled area is a section of your blog designated as able to accept widgets, such as a sidebar or footer. The number and types of areas available are set by the developer of your theme. All themes usually have at least one sidebar. Some themes allow the footer and the header to contain widgets.
- Drag a widget from the available widgets section on the left to a widget enabled area on the right, then update its settings underneath.
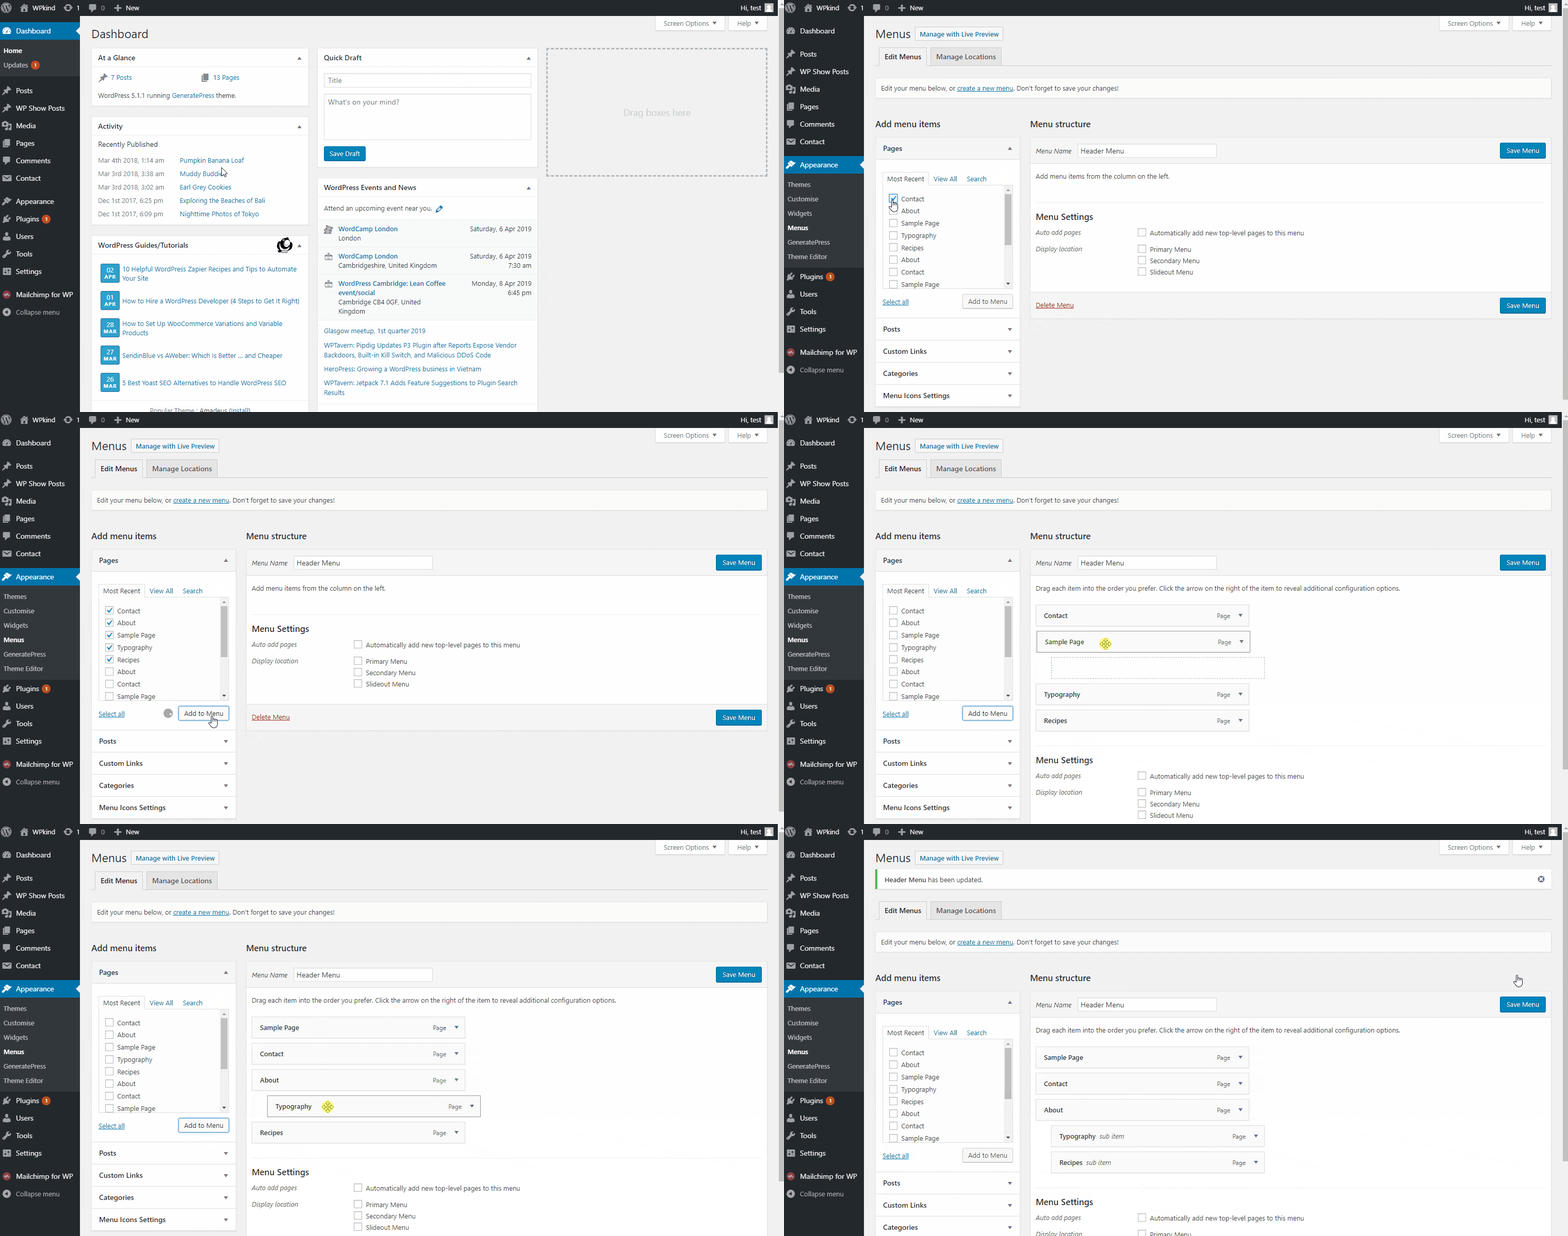
Using the Menu tab you can edit what pages appear in your menu. You can also add links to a particular post or a category to a menu.
- If you don’t already have a menu defined use the create a menu link to create your first menu, then assign it to a location in the menu settings section.
- You can add new items to the menu from the Add menu items section on the left and then use drag and drop to move them around.
Users
The Users tab allows you to manage all user accounts you have set up in WordPress.
When you first install WordPress, there will be one administrator account. An administrator is the highest level of WordPress account, i.e. you can do anything you that type of account.
If other people need to log into your site, typically you would give them lower permissions such as editor, contributor, or the lowest level, subscriber.
- You can add new users, just as you would a new post by clicking the Add New button or clicking Add New from the left-hand menu.
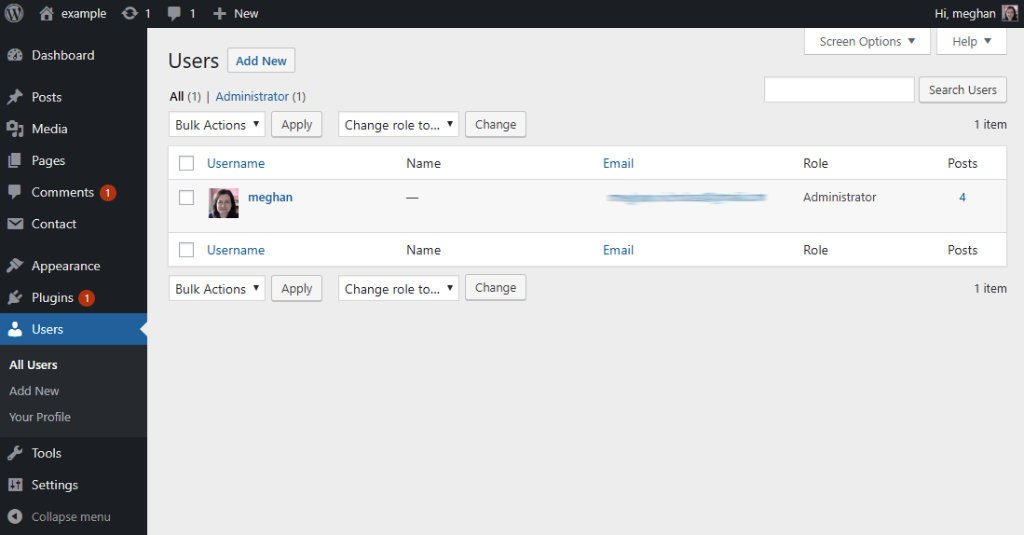
- Click on a user or mouse over and select Edit and you can make some modifications such as the colour scheme.
- You can also update user details such as name, email address and nickname. You cannot change the username.
Tools
The tools tab is where you can carry out some administrative tasks. You won’t need to use this section very often.
If your blog was previously on another blogging platform such as Blogger or Tumblr you can use the Tools->Import option to import the posts you created there.
If you were to move your blog to another host you could use the Tools->Export option to export your posts. However, the best way to migrate your site to another host is to copy the backend MYSQL database instead. Your new host should be able to help you with that.
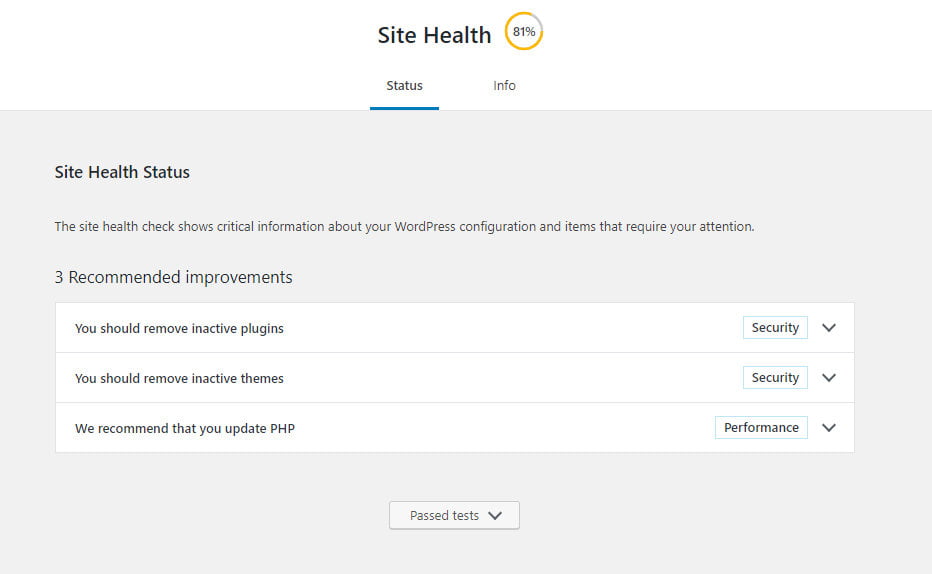
There is a new tab added since WordPress version 5.0 which allows you to assess your site heath. Here you will find suggestions as to things you can do to improve your site security and performance.
Here you can see that there are some inactive themes and plugins to remove, and also updating PHP is recommended. You can usually update the PHP version in cPanel on your hosting account, or contact support if you are not sure.
These are all things I suggest you do in my article to speed up your WordPress site.
You can export and erase personal data allowing you to comply with the GDPR. This is only useful if you allow other users to sign in to your WordPress site.
Settings
The settings tab is where you can configure your WordPress site.
The options found here are covered in my post Essential Settings After Installing WordPress. I thoroughly recommend you go through that post because there are a couple of things that if not done at the start can be a pain to correct later. Setting the permalinks is one of those things.
How to personalise the look of the dashboard
There isn’t a whole lot you can do to change how the dashboard looks. The colour scheme is the most common thing you might want to change.
Go to Users->Profile, and you can do the following things:
- Change the colour scheme.
- Show/hide the top toolbar (I recommend you keep it on)
- Enable shortcut keys for quick commenting moderation
- Turn off the visual editor, (I recommend you keep it on)
Wrapping up
In this article, I have taken you through everything you can do within the WordPress Admin dashboard to help you manage your WordPress blog.
Depending on what plugins you install there may be more that you can do. I recommend you consult the developer’s website for more information on the extra options available.
This post was proofread by Grammarly
